- Overview
- Prerequisites
- How to Enable the Best Price Plugin in Booster?
- How to Enable Best Price Guarantee for Single Product Pages in your Store?
- How to Enable Best Price Guarantee for Archives Product Pages?
- Form and Notice Options - Best Price Plugin
- Styling Options (Best Price Request Form)
- Email Options (Admin Email)
- Admin Options
- Reset Settings
- Process Flow of Best Price Plugin using Store Preview Screens
Overview #
When your WooCommerce store guarantees selling products at the best price, make sure that you live up to your buyers’ expectations. For example, if a customer finds another source selling the same product at a lower price and could prove the same, your store must let him prove his words and offer the same pricing for the product in question.
Wondering how to do it? The Best Price plugin in the Booster for WooCommerce Agency and Elite bundles can enable this functionality for your store. It lets you:
- Enable the best price challenge link/button for single product pages
- Enable the best price challenge link/button for archive pages, e.g. category pages
- Adds a pop-up form, giving users a chance to justify their claim, upon the button/link click
- Lets you include/exclude products and product categories from the best price guarantee
- Allows you to modify price request approval/rejection email
- Lets you select the Best Price History Meta Box Columns for admin emailer
- Lets admin approve or reject price change requests from the product page (in the editor)
Using this feature in your online store, you can impress your buyers with the best price guarantee. Even when your claim is not correct, the buyer has a reason to question you, which in turn, results in engagement. If your business finds the claim worthy of attention, you can always approve the price change request and convert the claim to a sale with added trust.
Prerequisites #
Your store must have the Booster for WooCommerce plugin installed and activated. Additionally, you should enable the best price module and configure it according to your requirements.
How to Enable the Best Price Plugin in Booster? #
- Log into your WordPress admin dashboard.
- Go to WooCommerce > Settings > Booster tab > Prices & Currencies category.
- Click on the Best Price link to open the plugin dashboard. Alternatively, you can use your browser’s page search option to find this plugin’s link in the Prices & Currencies category.
- Select the Enable Module for the Best Price option in the Best Price Module Options section.
- Click on the Save Changes button.

How to Enable Best Price Guarantee for Single Product Pages in your Store? #
Enabling the best price module for the single product pages implies that your online store will display an option (button or link) to open a pop-up form and claim the best price (with proof). The option will be available on all product pages, except for the one excluded from this setting.
To configure the best price guarantee functionality for your Single product pages, follow these steps:
- Once the Best Price plugin is activated on your store, go to WooCommerce > Booster Settings > Prices & Currencies > Best Price Module.
- Scroll down to the Single Product Pages section.
- Enable this feature using the Enable checkbox.
- Enter the Label to display to your buyers regarding the option for the best price claim.
- Select the type of Best Price click-to-action element as Link or Button.
- If you want to modify the display style of this CTA, enter the custom CSS for the same in the CSS Style input field.
- Select a Position where this button or link will be displayed on your product page. Your options are:
- Before the Product Title
- After the Product Title
- Before the Product
- After the Product
- In case there are multiple elements hooked to the selected Position, you can assign a higher or lower Position Priority or order to your Best Price button/link to control its visibility on your product page.
- Add products to include or exclude from the best price settings using the Products – Include or Products – Exclude options.
- Add product categories to include or exclude from the best price settings using the Product Categories – Include or Product Categories – Exclude options.
- Click on the Save Changes button to apply these changes.

Note: You can also edit details of the Form and Notice Options to change the pop-up form content. This pop-up form takes input regarding what is the product’s best price, which source is offering this price, etc. Scroll down to find how to do so.
Store Preview – Best Price Link on a Product Page #
Let’s say you enabled the following settings for the Single Product Pages in your store:

Here is how a product page will display the best price link:

Store Preview – Best Price Button on a Product Page #
Consider that you have enabled the best price button using the following settings:

The above setting will result in product pages similar to the one shown below:

How to Enable Best Price Guarantee for Archives Product Pages? #
The process to enable the Best Price Guarantee for the archive pages, e.g. a category or shop page, is very much similar to how we did it for the single product pages. However, the output scope of this setting differs.
You can enable links or buttons for your products on the archive pages, giving your buyers the option to submit the best price claim through a pop-up form from there only. The pop-up form’s contents can be modified using the settings in the Form and Notice Options section from the same plugin settings page.
To configure the best price feature for your archive product pages, consider these steps:
- Go to WooCommerce > Booster Settings > Prices & Currencies > Best Price Module.
- Make sure that the Best Price plugin is active. If not, enable it first.
- Navigate to the Archives Product Pages section and select Enable for the first checkbox.
- Specify the Label text.
- Choose between Link and Button as the Type of the Best Price CTA.
- To edit the CSS for your button or link, enter the in-line stylesheet contents in the CSS Style input field.
- Select a Position for the best price link/button from the following options:
- Before the Product Title
- After the Product Title
- Before the Product
- After the Product
- Specify the Position Priority or order to place this CTA in your preferred position in case of multiple elements sitting in the position you’ve selected.
- Add products or categories to include or exclude from the best price settings using the Products – Include, Products – Exclude, Product Categories – Include, and Product Categories – Exclude options.
- Click on the Save Changes button.

Store Preview – Best Price Links on an Archive Page #

Form and Notice Options – Best Price Plugin #
This section comprises the options to specify or modify the content of the best price claim pop-up form and the notices/alerts being created in this regard.
- Enter the Price Input label for the pop-up form. You can use the variable %currency_symbol% in this field.
- You may specify the Price Step, Minimum Price, Maximum Price, and/or Default Price values to give your users an idea of how much negotiation is allowed, even if they have a different best price source.

- Enter the Website Input Label to ask your potential buyer about their source of the best price.

- Specify the labels for the customer’s email, name, and message input fields.
- Enter the label for the ‘send a copy to customer’s inbox’ checkbox option.

- Specify the best price request pop-up form details, such as – Form header, form button label, form footer, customer notice, and the HTML for the required field (e.g. URL of the site offering the best price).

- Click on the Save Changes button.
Store Preview – Best Price Claim Form #
Clicking the CTA element, i.e. the button or the link, will open a pop-up form for the buyer. The elements of this form can be modified using the option in the Forms and Notices section in the plugin dashboard.

Styling Options (Best Price Request Form) #
Use the options in the Styling Options section to control the form design. You can specify the following details in this section:
- Form’s width
- Header Background Color
- Header Text Color
- Footer Background Color
- Footer Text Color

Email Options (Admin Email) #
The Email Options section will format the contents of the e-mail that your store’s administration will receive upon the arrival of a Best Price Request from a store user.
You may specify/edit the contents of the Email Recipient, Email Subject, and Email Template fields while using the variables allowed in the respective fields.

Admin Options #
The Admin Options section has an option Best Price History Meta Box Columns. For this option, you can select various product attributes.
Upon saving settings, the site administrator will be able to see the product details containing the values of selected attributes in the best price history meta-box. This implies that the admin will be able to make a better decision regarding the approval/rejection of the request – without visiting various pages in the store.

Reset Settings #
To reset the Best Price plugin’s setting in one click, scroll down to the plugin dashboard and click on the Reset Settings button. Doing so will trigger a browser pop-up (make sure that JavaScript is enabled) and select yes when it shows up.

Process Flow of Best Price Plugin using Store Preview Screens #
Still not sure how it works? Go through the next few screenshots to understand the working of the Best Price Module quickly. See it in action below:
A Product Page with Best Price Request Link #
Let’s say, a customer clicks a link for the best price claim.

It will result in the opening on a pop-up form, similar to the one shown below:
Frontend Best Price Request Form #

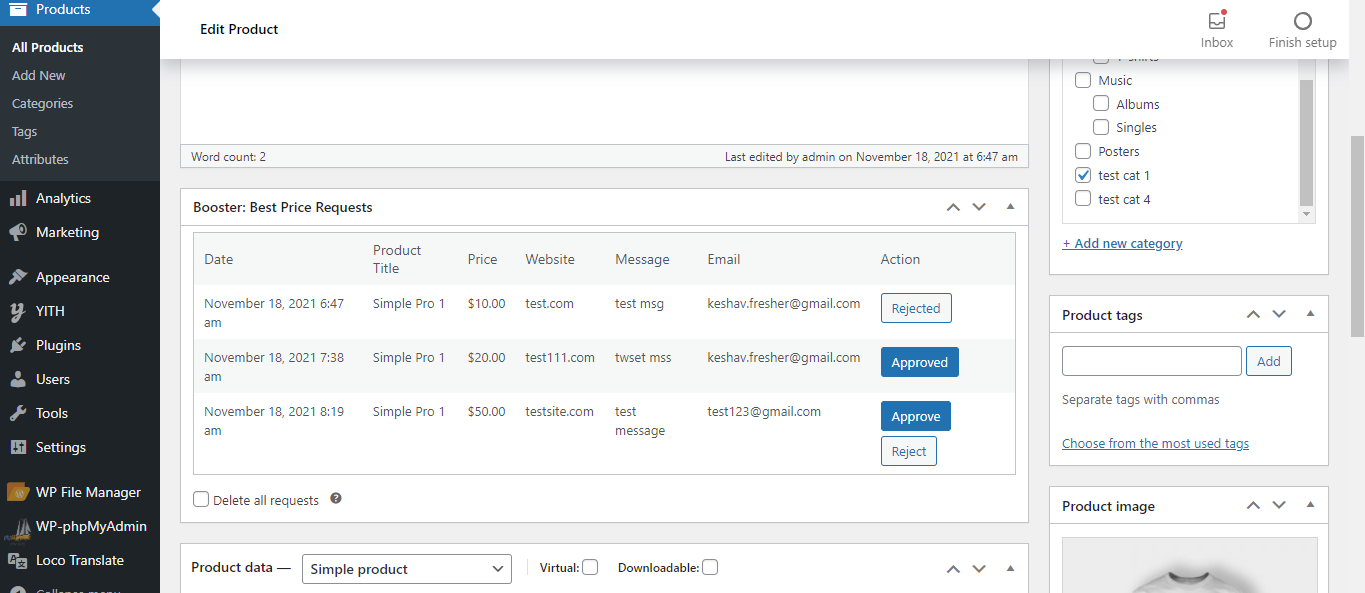
The admin will receive an email as well as an option to approve/reject the user’s request on the product page (in the editor mode)
Best Price Request Email Received by Site Admin when the customer sent a request #

Option to Approve or Reject User’s Request from the Product Page (Edit Mode) #
As per the action (approval/rejection of the request) taken by the site administration, an email is sent to the user. The email is forwarded to the e-mail ID/address shared while filling the best price request pop-up form.
- If the best price claim is accepted, the buyer will receive an email, notifying the same. Additionally, the email will contain a coupon link to buy this product at the approved best price.
- If the best price claim is rejected, the potential buyer will be notified about the same through an email.
Request Approval Email and Coupon #

Request Rejection Email #


